Checkboxes in React.js
Hold on!
This tutorial covers React 15 and is now out of date.
The good news is: Checkboxes in React 16 is available!
How do you use checkboxes in React.js? We've learnt about radio buttons in this tutorial, but what about checkboxes - do you use them differently in React?
The short answer is: yes.
Let me demonstrate how to use checkboxes with the help of a simple React application:
You can find the full source code in this GitHub repository.
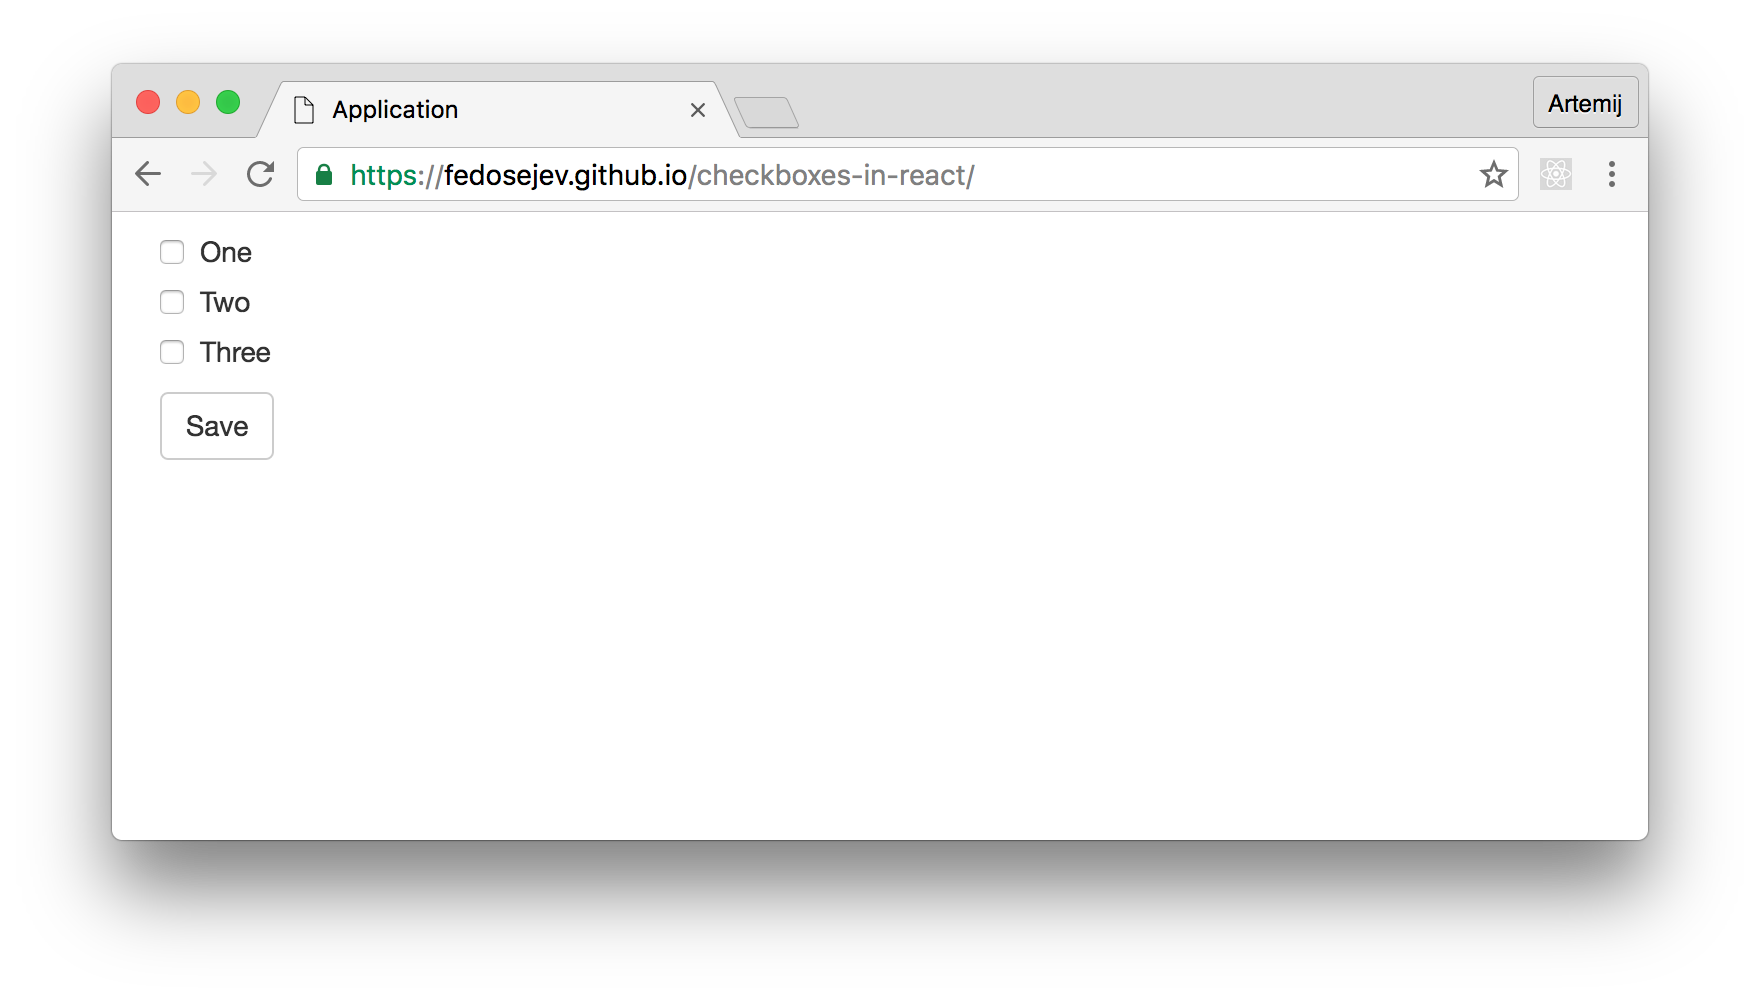
Our application is going to render a list of checkboxes with labels and a Save button. We can toggle checkboxes and click Save button. We will then see in the Developer Tools Console log messages that tell us which checkboxes were checked:

Our application will be made of two React components:
ApplicationCheckbox
Application component is a container component - it encapsulates our entire React.js application, and renders three instances of Checkbox component and a Save button. Application component also logs into the Developer Tools Console which checkboxes were checked when users click the Save button.
Checkbox component renders a checkbox with a label.
Let's create our Application component first:
import React, { Component } from 'react';
import Checkbox from './Checkbox';

const items = [
  'One',
  'Two',
  'Three',
];

class Application extends Component {
  componentWillMount = () => {
    this.selectedCheckboxes = new Set();
  }

  toggleCheckbox = label => {
    if (this.selectedCheckboxes.has(label)) {
      this.selectedCheckboxes.delete(label);
    } else {
      this.selectedCheckboxes.add(label);
    }
  }

  handleFormSubmit = formSubmitEvent => {
    formSubmitEvent.preventDefault();

    for (const checkbox of this.selectedCheckboxes) {
      console.log(checkbox, 'is selected.');
    }
  }

  createCheckbox = label => (
    <Checkbox
            label={label}
            handleCheckboxChange={this.toggleCheckbox}
            key={label}
        />
  )

  createCheckboxes = () => (
    items.map(this.createCheckbox)
  )

  render() {
    return (
      <div className="container">
        <div className="row">
          <div className="col-sm-12">

            <form onSubmit={this.handleFormSubmit}>
              {this.createCheckboxes()}

              <button className="btn btn-default" type="submit">Save</button>
            </form>

          </div>
        </div>
      </div>
    );
  }
}

export default Application;
First, let's focus on its render function:
render() {
  return (
    <div className="container">
      <div className="row">
        <div className="col-sm-12">

          <form onSubmit={this.handleFormSubmit}>
            {this.createCheckboxes()}

            <button className="btn btn-default" type="submit">Save</button>
          </form>

        </div>
      </div>
    </div>
  );
}
We see three div elements with class names that you might recognize if you're familiar with Bootstrap. Bootstrap helps us create layout for our page.
Now let's focus on the form element:
<form onSubmit={this.handleFormSubmit}>
  {this.createCheckboxes()}

  <button className="btn btn-default" type="submit">Save</button>
</form>
Inside of our form element we call this.createCheckboxes function that creates three instances of a Checkbox component. We'll see how exactly it does that in a moment. It's important to recognise that here we're creating our instances of a Checkbox component dynamically. If you're not familiar with this approach, then please read this tutorial first.
We then create a button element of type submit which will submit our form when user clicks on it, we're telling React to call this.handleFormSubmit function when this happens: <form onSubmit={this.handleFormSubmit}>.
Let's take a look at how exactly we're creating our instances of Checkbox component dynamically. Here is our createCheckboxes function:
createCheckboxes = () => (
  items.map(this.createCheckbox)
)
It iterates over items array and calls this.createCheckbox function for each item in that array. Where is items array coming from and what is it for?
In our Application.js file before declaring our Application component, we create items constant that references an array of three items:
const items = [
  'One',
  'Two',
  'Three',
];
['One', 'Two', 'Three'] - these are labels for our checkboxes. This array represents data that will dictate how many checkboxes we need to render and what their labels will be. For the purpose of this tutorial, we declare this data in our React component file, but in a real world web application this data can be received from a server or imported from another file.
Now we know that createCheckboxes function calls this.createCheckbox function for each label in items array. createCheckboxes function also returns an array of three instances of Checkbox component. That's because we call this.createCheckbox three times and each time it creates and returns an individual 'Checkbox' component instance:
createCheckbox = label => (
  <Checkbox
    label={label}
    handleCheckboxChange={this.toggleCheckbox}
    key={label}
  />
)
Each Checkbox component instance gets three properties:
label- the text that you see rendered next to a checkbox. This value is coming from ouritemsarray.handleCheckboxChange- a reference tothis.toggleCheckboxfunction. Every time user checks/unchecks a checkbox React callsthis.toggleCheckboxfunction. We'll see what it does in a moment.key- as you already know, each dynamically created React component instance needs akeyproperty that React uses to uniquely identify that instance.
Now we understand how we create and render three checkboxes in our application. What happens when user checks/unchecks our checkbox? As you will see later - every time user change checkbox's state - our this.toggleCheckbox is called.
Let's take a look at that toggleCheckbox function:
toggleCheckbox = label => {
  if (this.selectedCheckboxes.has(label)) {
    this.selectedCheckboxes.delete(label);
  } else {
    this.selectedCheckboxes.add(label);
  }
}
It gets a label parameter that represents which checkbox is being toggled. Now what exactly toggleCheckbox function does with a label?
It's a good time to zoom out for a second and talk about how our application works. There are a couple of questions we need to ask:
Each checkbox has two states: checked and unchecked. Which React component is responsible for managing that state?
How do we know which checkboxes are checked at any given moment in time?
We want to keep our application as simple as possible, so a simple answer for our first question is: let each Checkbox component instance maintain it's own state. Meaning: each Checkbox component instance is responsible for managing it's own state and knowing when it's checked or unchecked.
That's the key point: our Application component is not responsible for managing Checkbox component instance state and hence it doesn't know anything about it. The advantage of this approach is that now our Application component can create as many instances of a Checkbox component as we need and it doesn't need to deal with managing the state of each Checkbox instance. In addition this solution makes our Checkbox component more reusable as it doesn't depend on a parent component.
This sounds fantastic, but coming back to our second question: how do we know which checkboxes are checked in our Application component? This question highlights the disadvantage of our approach, because as I've mentioned earlier, our Application component knows nothing about state of each instance of a Checkbox component.
Luckily, there is no need for our Application component to know the state of each instance of a Checkbox component at any given time. All it needs to know is: which checkboxes are selected at any given time.
Should we store that information in Application component's state? Should we make our Application component stateful?
No. Remember in React you want to keep as little information in component's state as possible. And this should come naturally to you when you start thinking about it this way: does this information affects what my component is rendering? In other words, if that information changes - do I want React to rerender my component? If the answer is "no" - don't store it in component's state. If the answer is "yes", then that information represents your component's state and it should be stored in your component's state.
In the case of our Application component - when user checks or unchecks any checkbox that we render - do we need to rerender our Application component? The answer is clearly no. Therefore, we don't want to store a list of checked checkboxes in Application component's state.
Ok, if not in the component's state, then where? In a property that we can set on the component's class.
Let's set a property on the component's class that will store information about which checkboxes are checked. The next question that we should ask ourselves is: which data structure should I choose for storing that information?
What are the requirements for our perfect data structure?
- We should be able to easily add and delete our elements.
- All elements must be unique.
- We should be able to easily find out if the element is already stored.
That sounds like a description of a data structure that you might know about: Set.
Sets are not supported in ES5 version of JavaScript, but luckily, we're using ES2015 version of JavaScript where Sets are supported.
Now we know that we want to create a new Set and assign it to Application's component specification object.
The next question we need to answer is: when should we create our empty Set? That will depend on whether we want our Set to be created before or after the Application component is rendered.
The answer is: we want our Set to be created right before we mount our Application component:
componentWillMount = () => {
  this.selectedCheckboxes = new Set();
}
If you're not familiar with componentDidMount method or any other React component lifecycle methods, then please read this tutorial first.
this.selectedCheckboxes = new Set(); creates a new selectedCheckboxes property on component specification object and assigns a new set to it.
Now we have an empty set created right before our Application component is rendered. Then, when user checks/unchecks our checkboxes React will call toggleCheckbox function:
toggleCheckbox = label => {
  if (this.selectedCheckboxes.has(label)) {
    this.selectedCheckboxes.delete(label);
  } else {
    this.selectedCheckboxes.add(label);
  }
}
That function will reference our set and check if a specific checkbox label is in that set:
if (this.selectedCheckboxes.has(label)) {}
If the label is already in our set then we delete from the set:
this.selectedCheckboxes.delete(label);
Otherwise, we add it to our set:
this.selectedCheckboxes.add(label);
And that's how our Application component is going to know which checkboxes are checked at any given moment in time. If the label in the set - it's checked; if not - it's unchecked.
What happens when the user clicks Save button? Our form is submitted and our handleFormSubmit function is called by React:
<form onSubmit={this.handleFormSubmit}>...</form>
Let's take a look at handleFormSubmit function:
handleFormSubmit = formSubmitEvent => {
  formSubmitEvent.preventDefault();

  for (const checkbox of this.selectedCheckboxes) {
    console.log(checkbox, 'is selected.');
  }
}
First it prevents the default behavior of a form's submit event:
formSubmitEvent.preventDefault();
And then:
for (const checkbox of this.selectedCheckboxes) {
  console.log(checkbox, 'is selected.');
}
It uses for... of statement to iterate through our this.selectedCheckboxes set and log every item from that set. Which effectively prints the label of every checked checkbox.
for... of statement is available to us in JavaScript version ES2015.
Now you know how what our Application component does and how it works.
Next let's take a look at our Checkbox component:
import React, { Component, PropTypes } from 'react';

class Checkbox extends Component {
  state = {
    isChecked: false,
  }

  toggleCheckboxChange = () => {
    const { handleCheckboxChange, label } = this.props;

    this.setState(({ isChecked }) => (
      {
        isChecked: !isChecked,
      }
    ));

    handleCheckboxChange(label);
  }

  render() {
    const { label } = this.props;
    const { isChecked } = this.state;

    return (
      <div className="checkbox">
        <label>
          <input
                            type="checkbox"
                            value={label}
                            checked={isChecked}
                            onChange={this.toggleCheckboxChange}
                        />

          {label}
        </label>
      </div>
    );
  }
}

Checkbox.propTypes = {
  label: PropTypes.string.isRequired,
  handleCheckboxChange: PropTypes.func.isRequired,
};

export default Checkbox;
Our Checkbox component is a stateful component because it needs to know whether a checkbox element should be rendered as checked or unchecked.
We'll use class property state to set the initial state of our Checkbox component:
state = {
  isChecked: false,
}
The state of our component is represented by isChecked property. By the default its value is set to false because initially we want every checkbox to render as unchecked.
Let's see what our Checkbox component renders:
render() {
  const { label } = this.props;
  const { isChecked } = this.state;

  return (
    <div className="checkbox">
      <label>
        <input
                      type="checkbox"
                      value={label}
                      checked={isChecked}
                      onChange={this.toggleCheckboxChange}
                  />

        {label}
      </label>
    </div>
  );
}
It renders div element with a Bootstrap class name that we use for styling. Inside of it we have label element with two children: 1) input element and 2) label text.
The input element renders the checkbox. It has 4 properties:
type- the type of input:checkboxin our case.value- the value of input: which is a label name passed as property from a parentApplicationcomponent.checked- whether it's checked or not. The value comes from component's state propertyisChecked.onChange-changeevent handler:this.toggleCheckboxChangefunction will be called when user checks or unchecks a checkbox.
The label text is coming from a property label that is passed from a parent Application component. It will be either One, Two or Three.
Now if you read this tutorial, you will recognise that our input element is a controlled component because we "control" the value property by providing our own value that comes from this.props.label. If you're not sure about the difference between controlled components and uncontrolled components, then I recommend you read this tutorial.
What happens when the user toggles our checkbox? this.toggleCheckboxChange function is called:
toggleCheckboxChange = () => {
  const { handleCheckboxChange, label } = this.props;

  this.setState(({ isChecked }) => (
    {
      isChecked: !isChecked,
    }
  ));

  handleCheckboxChange(label);
}
It changes Checkbox component's state. It set's isChecked's value to the opposite of it's current value and it calls handleCheckboxChange function which is passed to Checkbox component as a property by it's parent Application component:
const { handleCheckboxChange, label } = this.props;
// ...
handleCheckboxChange(label);
This function call will trigger toggleCheckbox function in Application component that will add or delete the label name that we're passing as an argument via this.props.label from the set.
That's how our Application component will always know which checkboxes are selected at any given moment in time.
And now you know how to use checkboxes in React.js!
Notice that this solution works great for our specific needs. If you have different requirements you might need to think of a different way of creating checkboxes. For example, how do you implement a button that checks all checkboxes? I'll leave it for you to figure it out as a challenge! And if you do figure it out - please propose your tutorial for this website!
Thank you for reading this React tutorial!
Please take a look at the complete source code on GitHub and the live version of our app.
I hope you've enjoyed this tutorial and I would love to hear your feedback in the comments. You can get in touch with me via Twitter and email.

P.S. I've also written React.js Essentials book and I teach people React.js and JavaScript!