How To Use React.js Component Lifecycle Methods
Everything in this universe has a lifecycle. It means everything is constantly changing over time. From the moment you're born - you start changing - you're getting older. We divide our life into parts that we call The Stages of Life.
Your React.js components are no exception - they too have a lifecycle. They go through stages that are called phases in React terminology. Those phases are:
- Mounting
- Updating
- Unmounting
From the moment your component is born - when it's initially being rendered - it enters the Mounting Phase. Once your component is living a happy life and is being updated it enters the Updating Phase. Finally when it's time to end it's life it enters the Unmounting Phase.
The lifecycle of your React components can vary from quite short to all-time long. It all depends on your web application needs and how your users use it.
When your user opens your React application - the necessary components go through Mounting Phase. Once your user starts interacting with your React application - some components go through the Updating Phase, while others - immediately face the Unmounting Phase.
As a developer you would like to tap into a component's lifecycle and get notified when that component is going through various lifecycle phases. This will allow you to control how your application looks and behaves at any given point in time.
How can we get notified when component is going through various lifecycle phases? React provides us with a collection of lifecycle methods that we can declare. When we declare them React will call them when component is going from one phase to another!
In this tutorial we're going to build a simple React application that demonstrates how to use React component lifecycle methods.
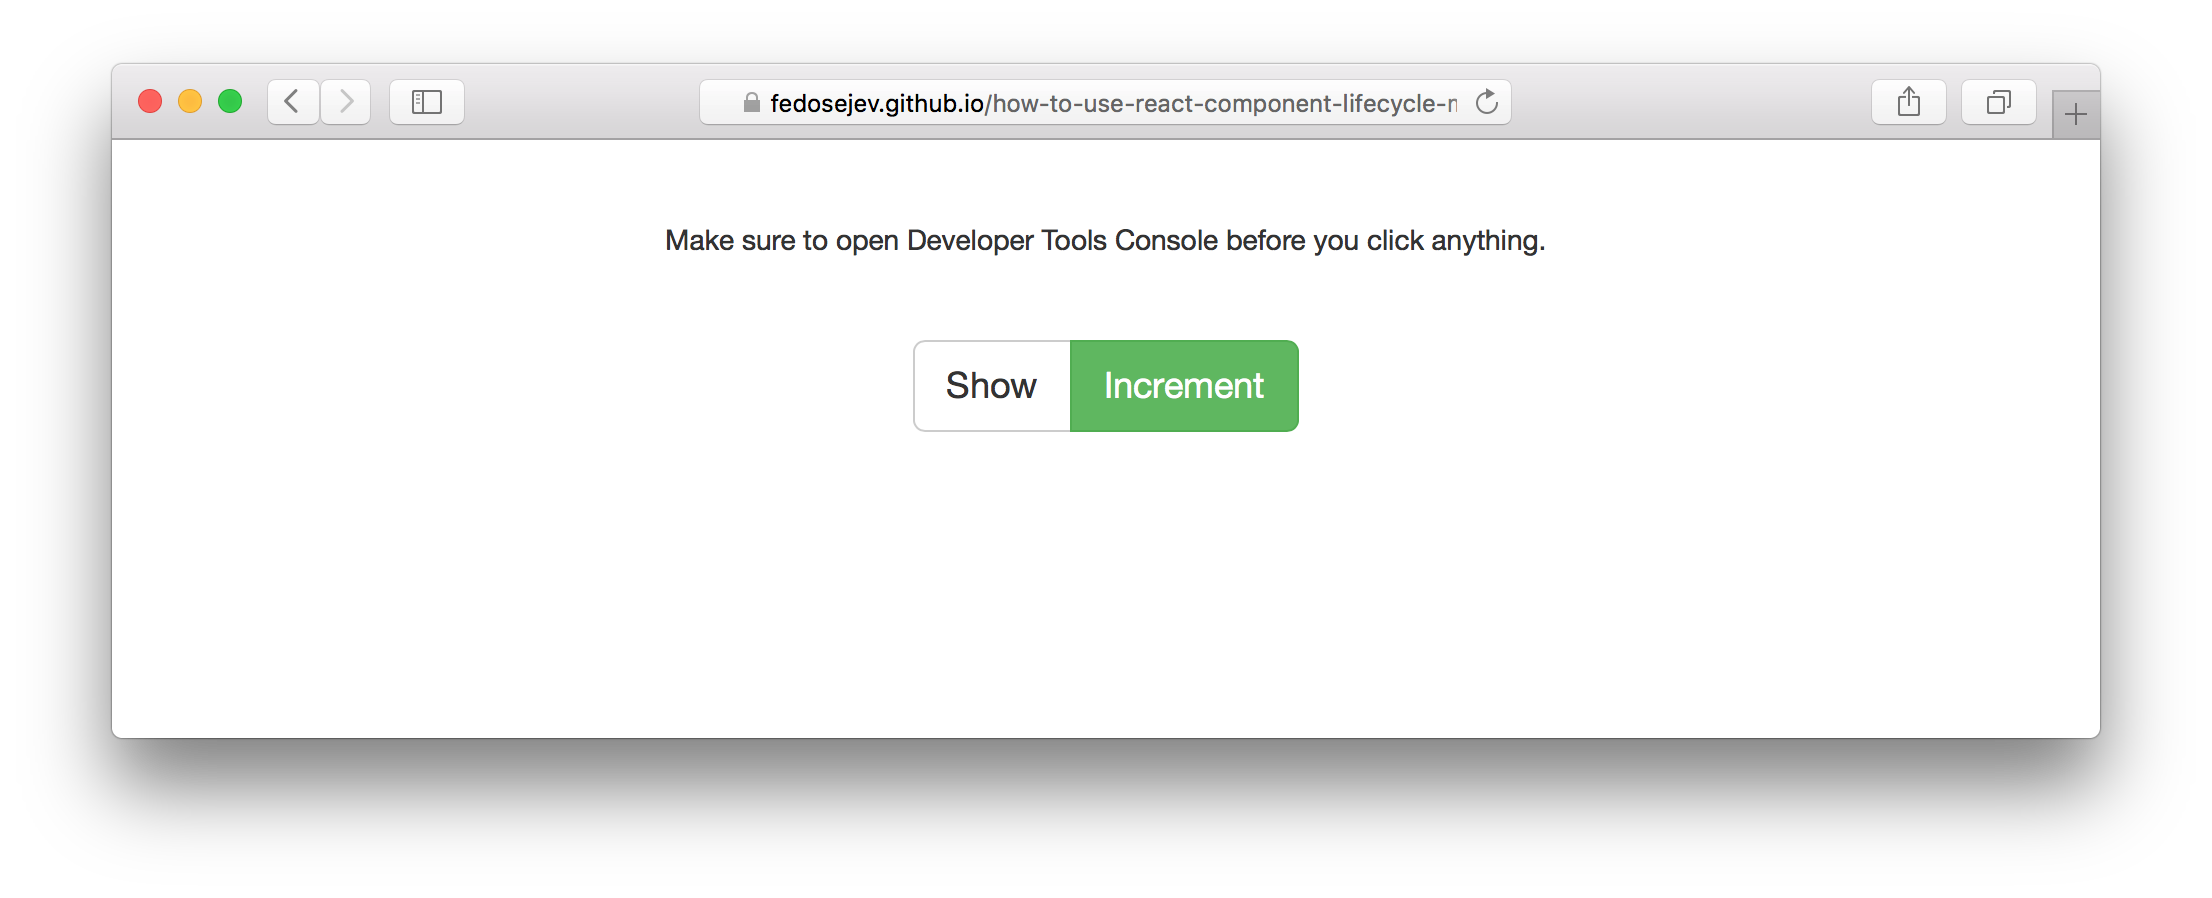
Here is our application:

You can find the full source code in this GitHub repository.
Our application is going to render a text paragraph, Show/Hide button, Increment button and a counter value. A text paragraph will remind the user to open the Developer Tools Console - there we're going to log which component lifecycle methods is being executed by React. Show/Hide button will toggle our counter. Increment button will increase counter's value by 1.
Our application will be made of 2 React components:
ApplicationCounter
Application component is a contrainer component - it encapsulates our entire React.js application. Counter component renders a counter text and logs into the Developer Tools Console which React component lifecycle methods are being executed.
Let's create our Application component first:
import React from 'react';
import Counter from './Counter.jsx';

let Application = React.createClass({

  getInitialState: function () {
    return {
      counter: 0,
      isCounterHidden: true
    };
  },

  toggleCounter: function () {
    this.setState({
      isCounterHidden: ! this.state.isCounterHidden
    });
  },

  incrementCounter: function () {
    this.setState({
      counter: this.state.counter + 1
    });
  },

  render: function () {

    let style = {
      marginTop: '40px',
      marginBottom: '10px'
    };

    return (
      <div className="container">
        <div className="row">
          <div className="col-sm-6 col-sm-offset-3 text-center">

            <p style={style}>Make sure to open Developer Tools Console before you click anything.</p>

            <div className="btn-group btn-group-lg" role="group" aria-label="..." style={style}>
              <button type="button" className="btn btn-default" onClick={this.toggleCounter}>{this.state.isCounterHidden ? 'Show' : 'Hide'}</button>
              <button type="button" className="btn btn-success" onClick={this.incrementCounter}>Increment</button>
            </div>

            {this.state.isCounterHidden ? null : <Counter value={this.state.counter} />}

          </div>
        </div>
      </div>
    );
  }
});

export default Application;
The first thing to notice about our Application component is that it's a stateful component:
getInitialState: function () {
  return {
    counter: 0,
    isCounterHidden: true
  };
}
It has getInitialState function that returns an object with counter and isCounterHidden properties. counter property tracks the current value of our counter. isCounterHidden tracks whether our counter is hidden or not.
Initially, when our Application component is rendered for the first time we want our counter to be hidden and it's value to be 0.
Let's talk about how are we going to change our Application component's state. How are we going to change those values - 0 and true? They have to change, otherwise, if those values will never change, we shouldn't declare them as component's state at all.
To change those values our Application component declares 2 functions: toggleCounter and incrementCounter.
toggleCounter function sets isCounterHidden's value to the opposite of it's current value:
toggleCounter: function () {
  this.setState({
    isCounterHidden: ! this.state.isCounterHidden
  });
}
incrementCounter function adds 1 to the current value of the counter property:
incrementCounter: function () {
  this.setState({
    counter: this.state.counter + 1
  });
}
You might be wondering: who's calling toggleCounter and incrementCounter and when?
To answer these questions - let's take a look at the render function of our Application component:
render: function () {

  let style = {
    marginTop: '40px',
    marginBottom: '10px'
  };

  return (
    <div className="container">
      <div className="row">
        <div className="col-sm-6 col-sm-offset-3 text-center">

          <p style={style}>Make sure to open Developer Tools Console before you click anything.</p>

          <div className="btn-group btn-group-lg" role="group" aria-label="..." style={style}>
            <button type="button" className="btn btn-default" onClick={this.toggleCounter}>{this.state.isCounterHidden ? 'Show' : 'Hide'}</button>
            <button type="button" className="btn btn-success" onClick={this.incrementCounter}>Increment</button>
          </div>

          {this.state.isCounterHidden ? null : <Counter value={this.state.counter} />}

        </div>
      </div>
    </div>
  );
}
In render function we declare style variable with some properties for our inline styling purposes. We also declare 3 <div> elements with various class names - these are Bootstrap class names that we use to create the layout for our page.
We then create p element with a static text and inline styling:
<p style={style}>Make sure to open Developer Tools Console before you click anything.</p>
The important part of the render function that we need to focus on is this:
<div className="btn-group btn-group-lg" role="group" aria-label="..." style={style}>
  <button type="button" className="btn btn-default" onClick={this.toggleCounter}>{this.state.isCounterHidden ? 'Show' : 'Hide'}</button>
  <button type="button" className="btn btn-success" onClick={this.incrementCounter}>Increment</button>
</div>

{this.state.isCounterHidden ? null : <Counter value={this.state.counter} />}
Here we're rendering two buttons. The first one is Show/Hide button:
<button type="button" className="btn btn-default" onClick={this.toggleCounter}>{this.state.isCounterHidden ? 'Show' : 'Hide'}</button>
This button's text can either be Show or Hide and we decide which one to render based on the current state of our Application component, or to be more specific - based on the value of this.state.isCounterHidden property:
{this.state.isCounterHidden ? 'Show' : 'Hide'}
If the value of this.state.isCounterHidden is true - we render Show text and if it's false - we render Hide text. Meaning: when our counter is hidden we want our button to say Show, and when it's shown - Hide.
So what happens when the user clicks that button? React will call our toggleCounter function, because our button has onClick property with the value of this.toggleCounter:
<button ... onClick={this.toggleCounter}>...</button>
As we know toggelCounter function will call setState function that changes a component's state and when a component's state changes - React rerenders that component and all child components by default.
Effectively: when the user clicks Show button, Application component's state changes and Hide button is being rendered instead of Show.
The second button that our Application component renders is Increment button:
<button type="button" className="btn btn-success" onClick={this.incrementCounter}>Increment</button>
As you can see it also has onClick property with the value of this.incrementCounter. When the user clicks that button React will call our incrementCounter function that will change Application component's state and rerender Application component.
Now we know how we render our buttons and how they work.
What about our Counter component? Where do we render it and what does it do? Let's answer these questions.
If we look carefully at the render function in our Application component - we'll see this statement:
{this.state.isCounterHidden ? null : <Counter value={this.state.counter} />}
That's where we decide whether to render an instance of the Counter component or not. We make that decision based on the current state of our Application component: if this.state.isCounterHidden is set to true - we'll render null, otherwise if it's set to false - we'll render <Counter value={this.state.counter} />.
As you can see, when we're rendering an instance of Counter component we're passing a property value with this.state.counter assigned to it. Meaning: the Counter component instance will always get the latest counter value that we store in Application component's state.
And that's our Application component.
In this tutorial we want to learn about how to use React component lifecycle methods. That's the goal for our Counter component - to render a counter value and demonstrate when and which lifecycle methods are being called by React.
Let's take a look at our Counter component:
import React from 'react';

let Counter = React.createClass({

  getDefaultProps: function () {
    console.debug('getDefaultProps');

    return {};
  },

  getInitialState: function () {
    console.debug('getInitialState');

    return {};
  },

  componentWillMount: function () {
    console.debug('componentWillMount');
  },

  componentDidMount: function () {
    console.debug('componentDidMount');
  },

  componentWillReceiveProps: function () {
    console.debug('componentWillReceiveProps');
  },

  shouldComponentUpdate: function () {
    console.debug('shouldComponentUpdate');

    return true;
  },

  componentWillUpdate: function () {
    console.debug('componentWillUpdate');
  },

  componentDidUpdate: function () {
    console.debug('componentDidUpdate');
  },

  componentWillUnmount: function () {
    console.debug('componentWillUnmount');
  },

  render: function () {
    console.debug('render');

    return (
      <h1 className="text-muted">Counter: {this.props.value}</h1>
    );
  }
});

export default Counter;
As you can see it has a lot of component lifecycle methods. They are:
getDefaultPropsgetInitialStatecomponentWillMountcomponentDidMountcomponentWillReceivePropsshouldComponentUpdatecomponentWillUpdatecomponentDidUpdatecomponentWillUnmountrender
All these methods are being called by React. We don't call them explicitly ourselves. We make React to call them. For example, you already know that when we call setState function to update a component's state - React will call render method. In fact as you will learn in a moment - React will call other component lifecycle methods as well.
To make sure that we understand at what point in time these component lifecycle methods are being called we make each of these methods call console.debug function. This will print a log message in Developer Tools Console. What we want is to log the fact that a certain component lifecycle method is being called in a certain order. You will learn that component lifecycle methods are called in specific order.
Notice that our Counter component renders <h1> element with a this.props.value property that a parent Application component passed to it:
render: function () {
  console.debug('render');

  return (
    <h1 className="text-muted">Counter: {this.props.value}</h1>
  );
}
Other lifecycle methods in our Counter component don't do anything useful apart from logging the fact that React called them.
It's time to run an experiment!
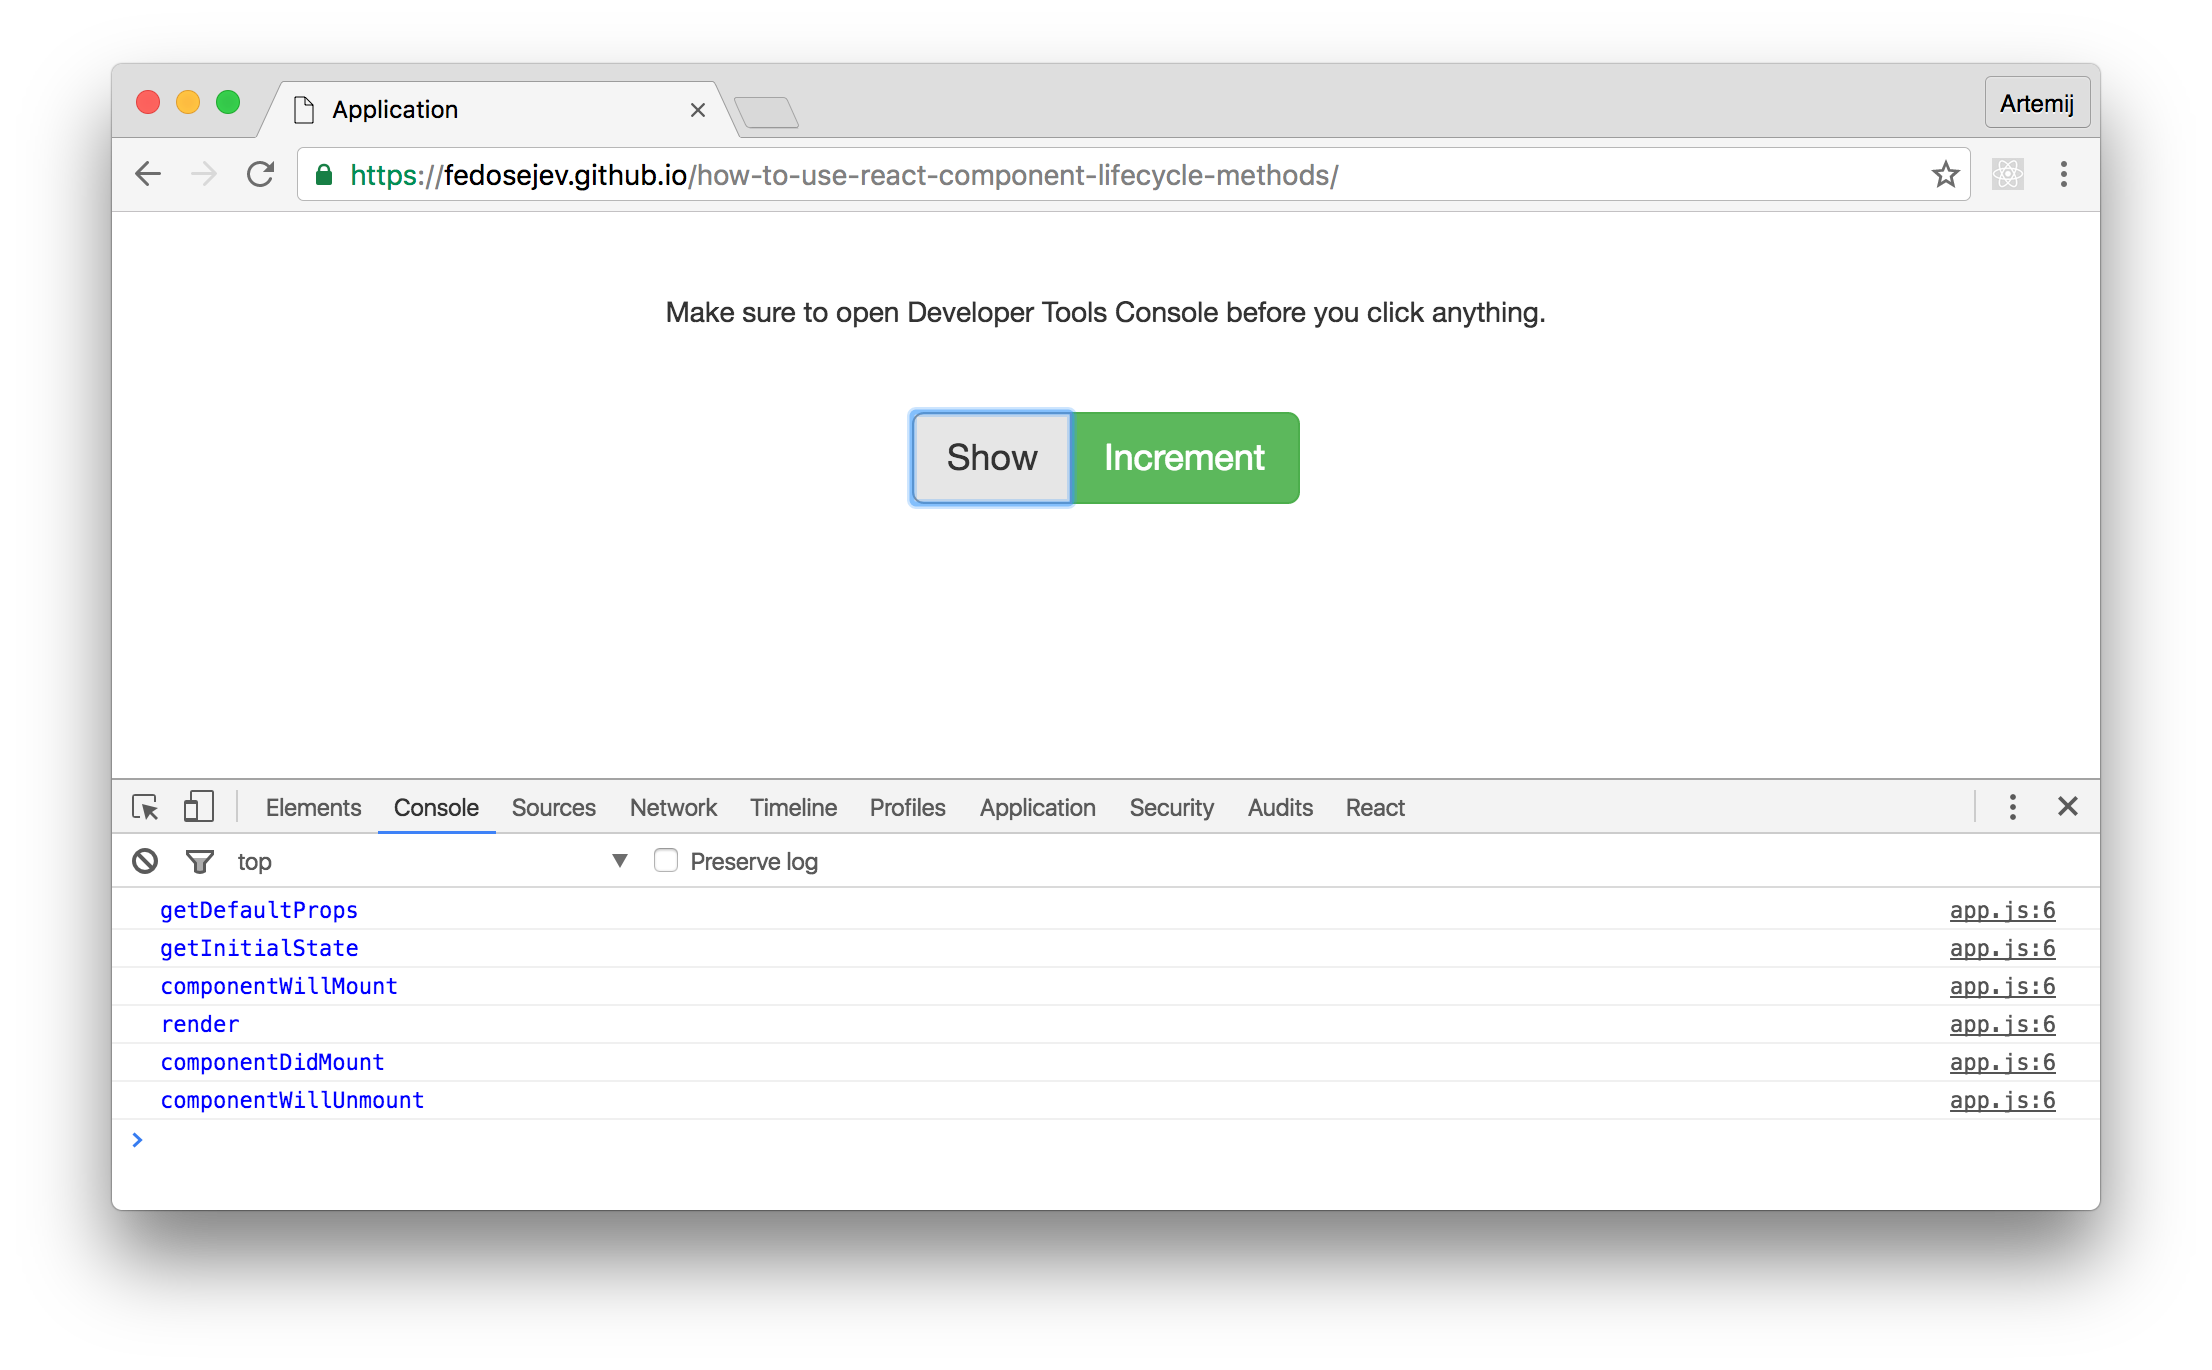
Step 1: Open our application in Google Chrome web browser
Click here to open a fully working application hosted on GitHub Pages.
Step 2: Open Developer Tools JavaScript Console
In Google Chrome go to: View > Developer > JavaScript Console or use keyboard shortcut: Cmd + Alt + J on Mac and Ctr + Shift + J on Windows.
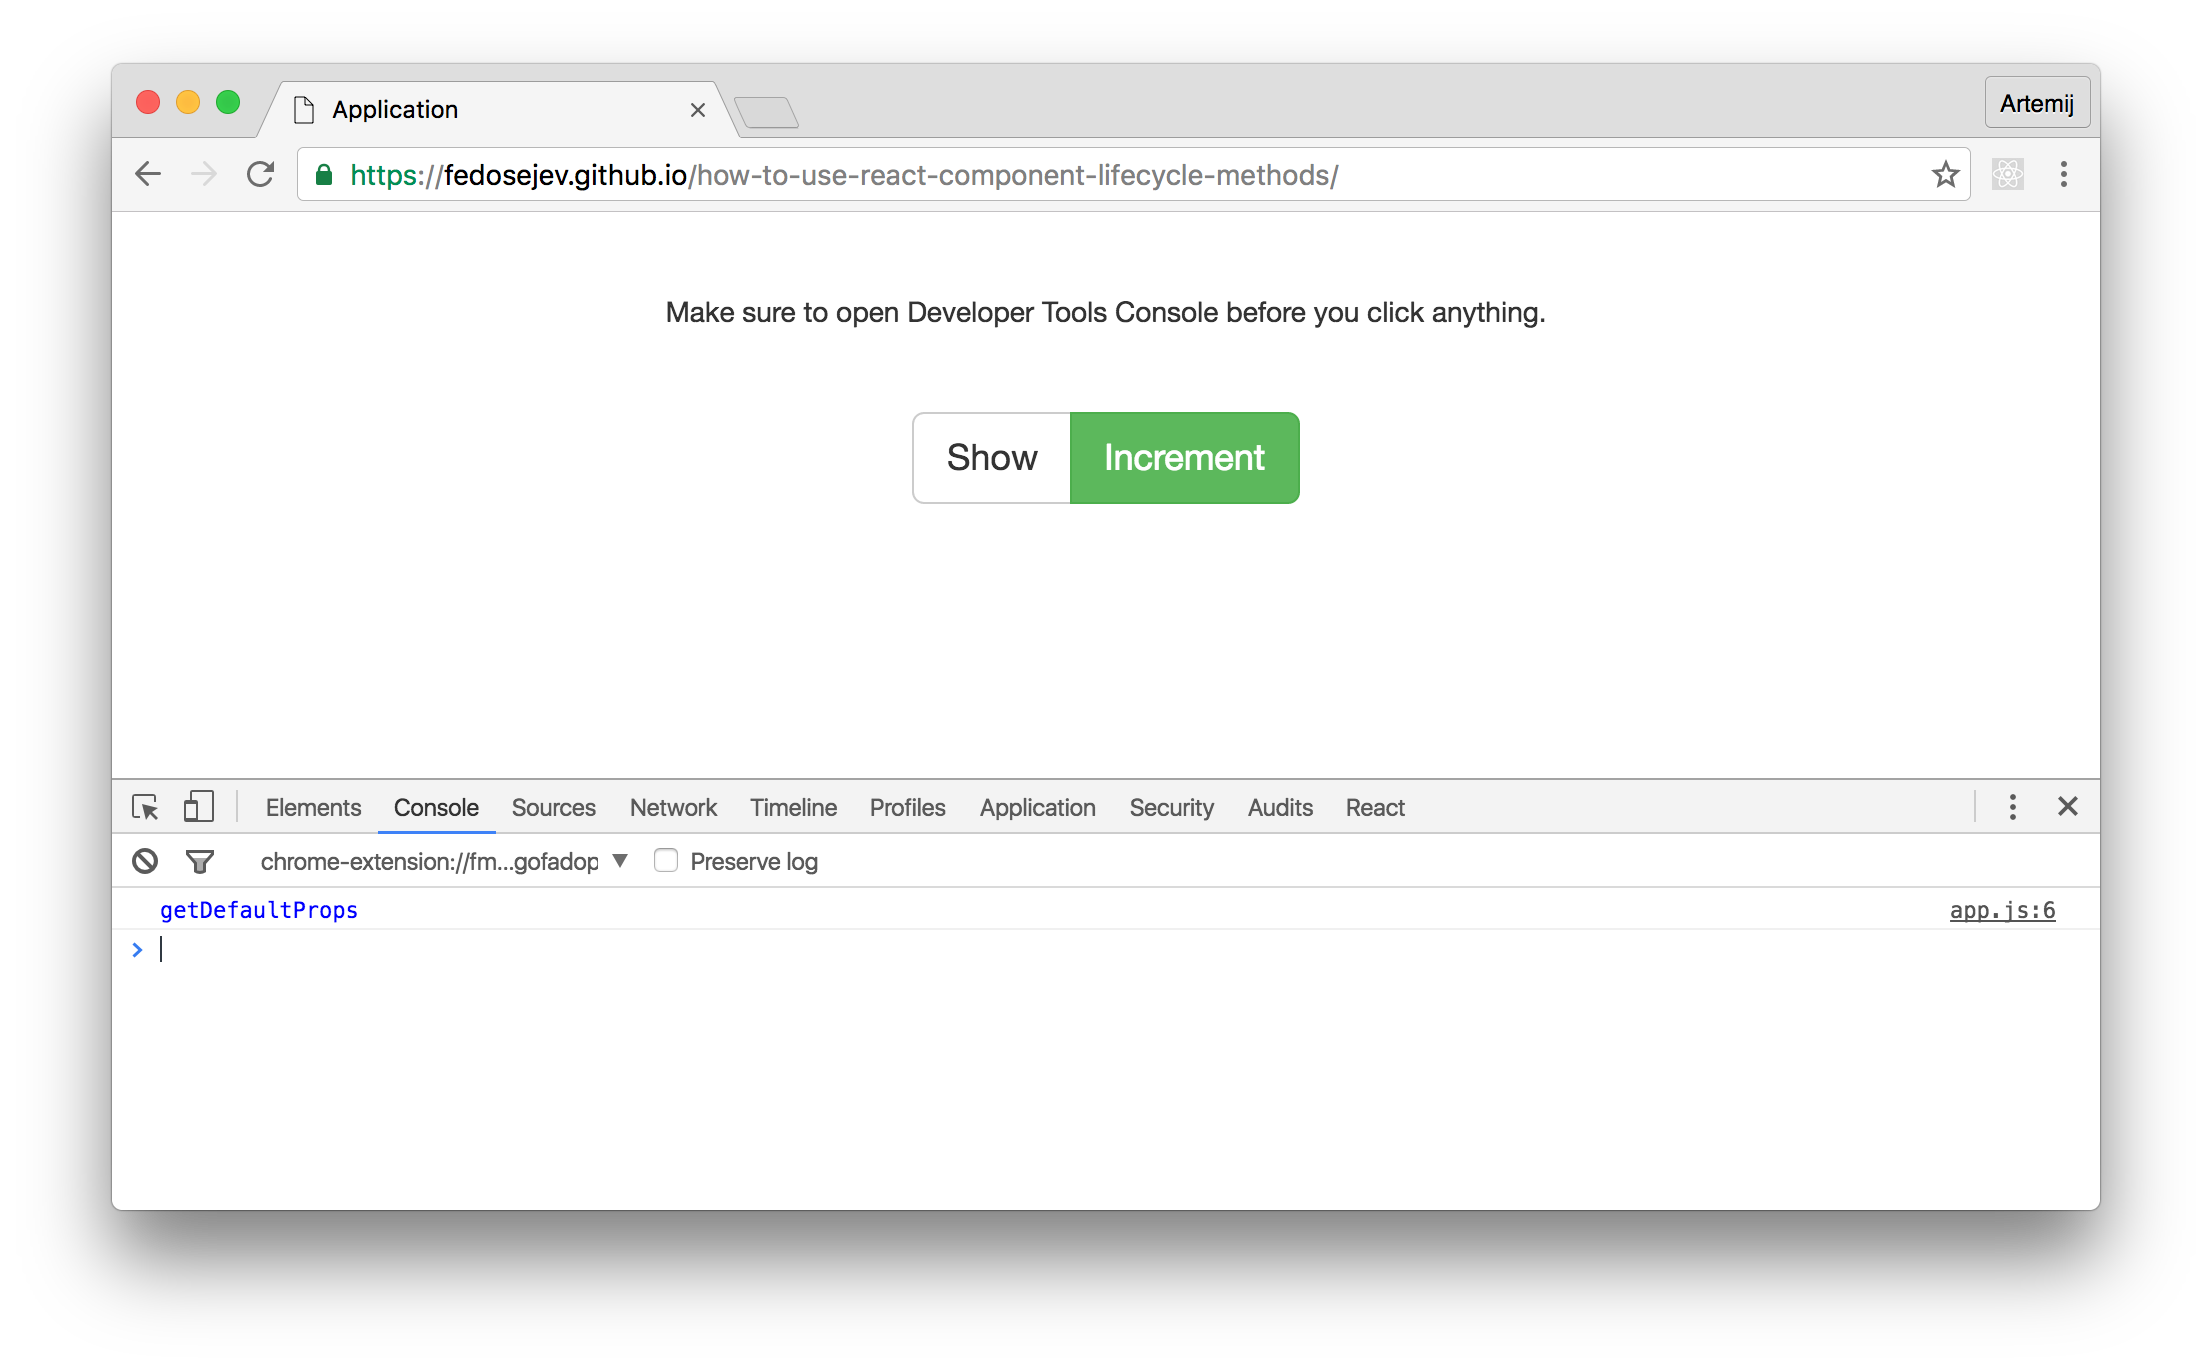
Notice that immediately we see getDefaultProps in blue in JavaScript Console. This is interesting: we can clearly tell that our Counter component instance was not rendered, but getDefaultProps method from our Counter component class was called by React (and that's where we're calling console.debug function that prints that blue message). This is because getDefaultProps is being called only once when we create Counter class - not when we render Counter component class instance. If you would like to learn more about getDefaultProps method - please read this tutorial.
Remember at the beginning of this tutorial I've mentioned that React component lifecycle methods are grouped by 3 phases: Mounting, Updating and Unmounting. Can you tell which phase our Counter component instance is going through?
None of them. Our Counter component class instance wasn't created yet. It wasn't born yet, so no lifecycle has begun yet. And so no lifecycle methods were called by React yet.
In React's terminology, Counter component was not mounted yet.
Step 3: Click on Show button
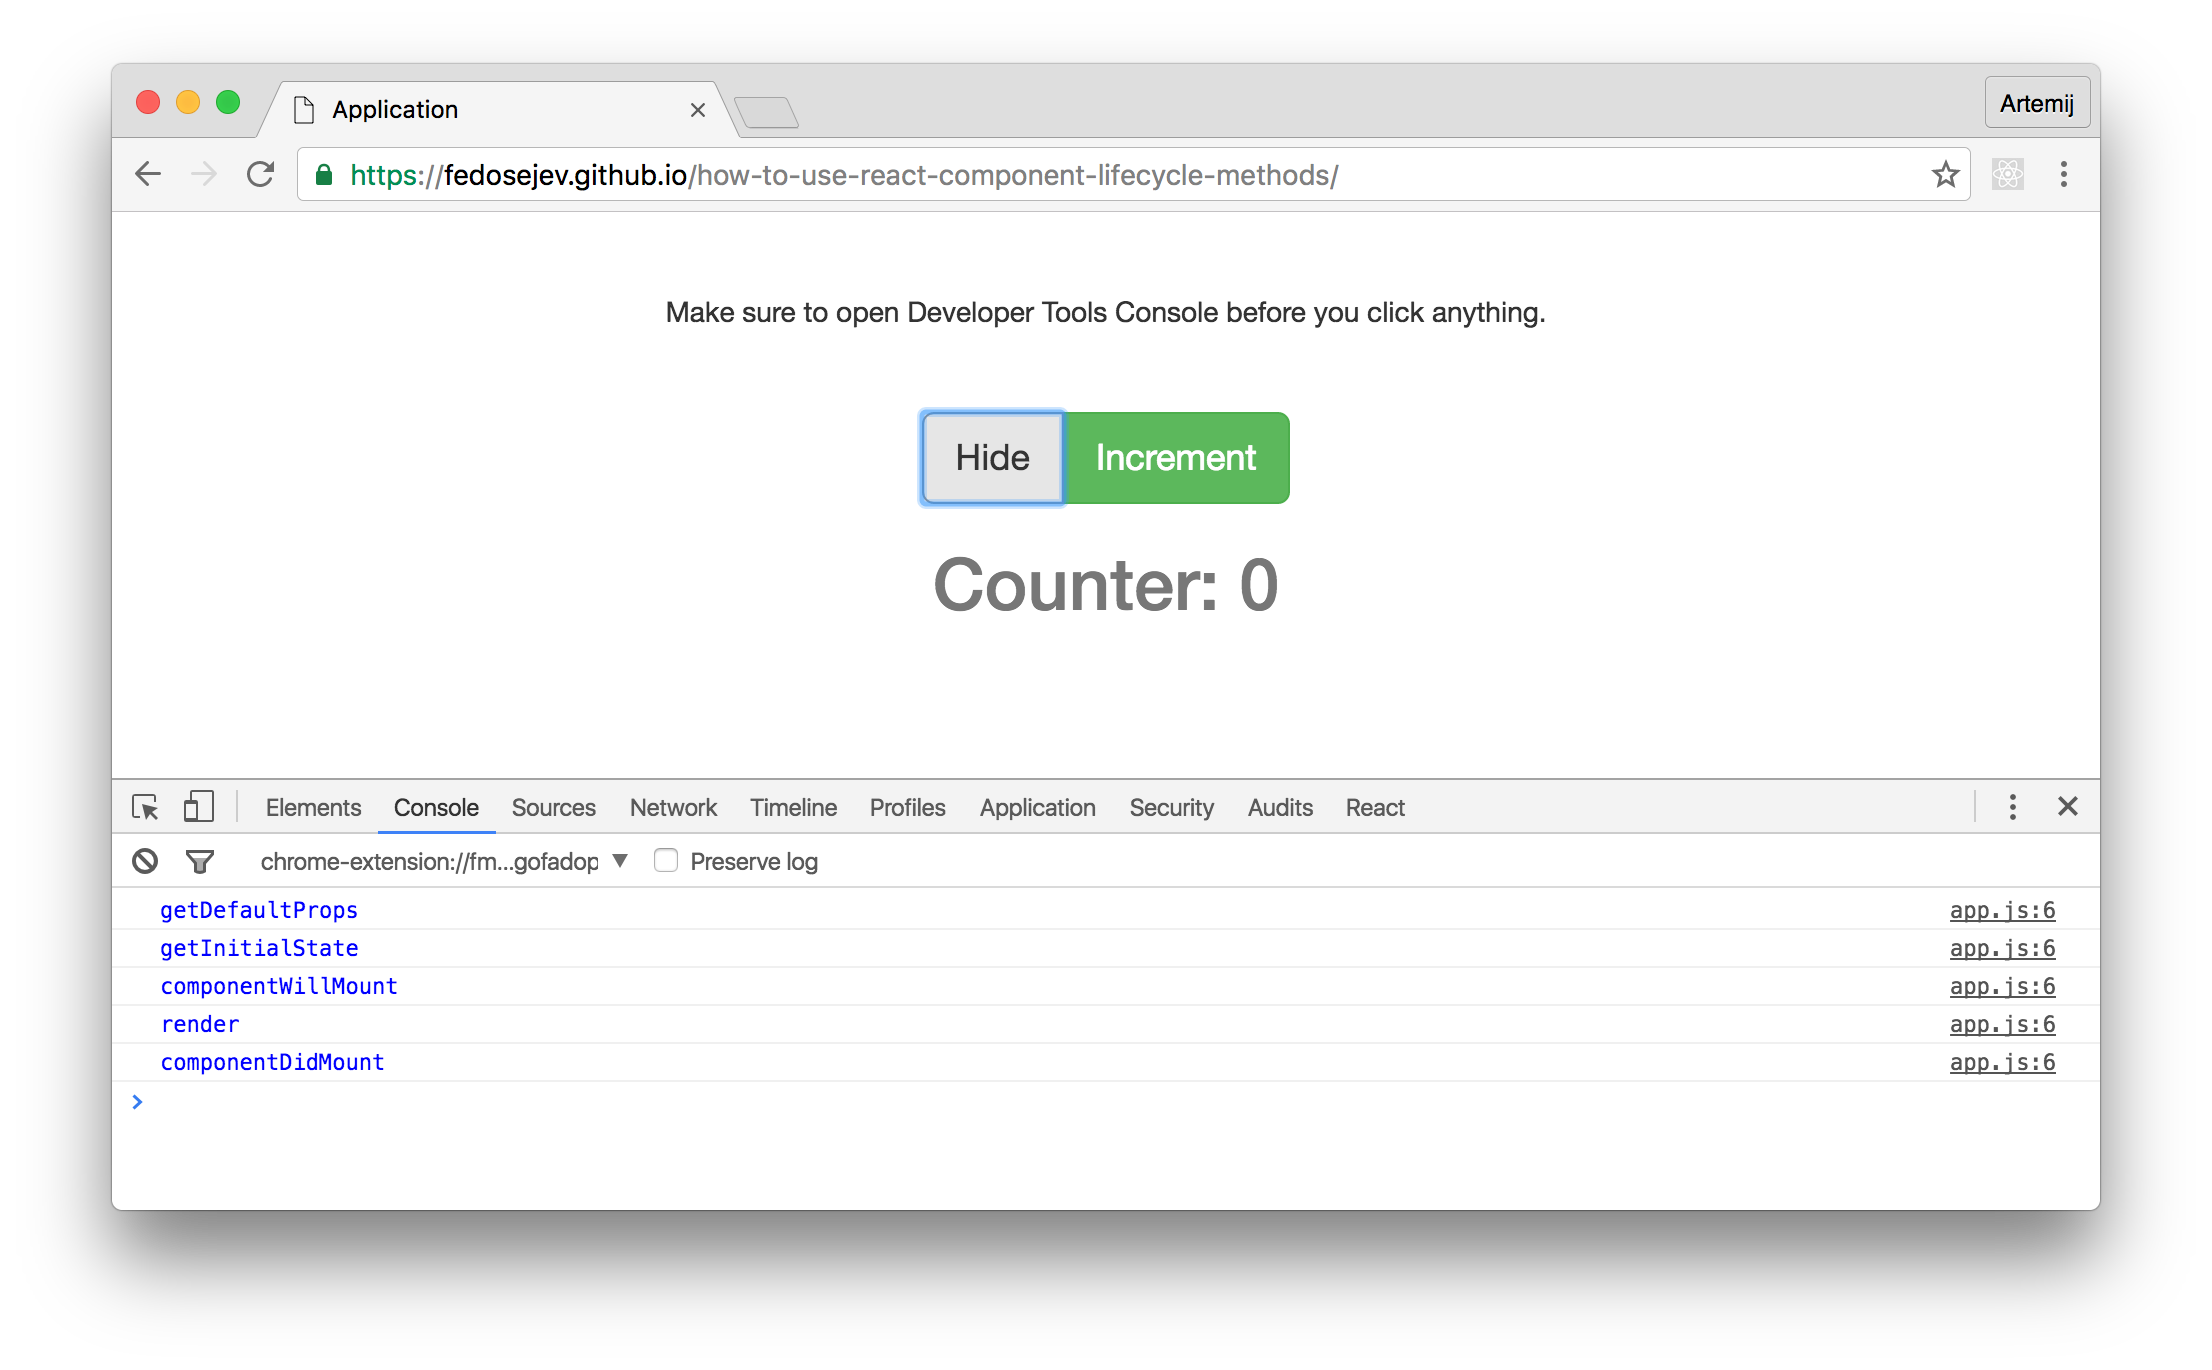
It's alive!
We've just created and rendered our Counter component class instance! That instance has started it's lifecycle. React has called it's lifecycle methods: 1) getInitialState, 2) componentWillMount, 3) render and 4) componentDidMount. The order in which lifecycle methods are being called is important:
getInitialState- set's the initial state for ourCountercomponent class instance. This state will then be available to us viathis.stateobject.componentWillMount- is called right before React mounts (or renders)Countercomponent class instance into the DOM.render- rendersCountercomponent class instance into the DOM - that's when we can see our counter on the screen and in our DOM.componentDidMount- is called right after React has finished mounting (or rendering)Countercomponent class instance into the DOM.
As you might have guessed - what we've just witnessed and described is called - Mounting Phase. All those 4 lifecycle methods belong to the Mounting Phase.
So at the moment our Counter component instance is mounted into the DOM and we're waiting until some other event will trigger for that to change.
Our counter is showing 0 - let's change that!
Step 4: Click on Increment button
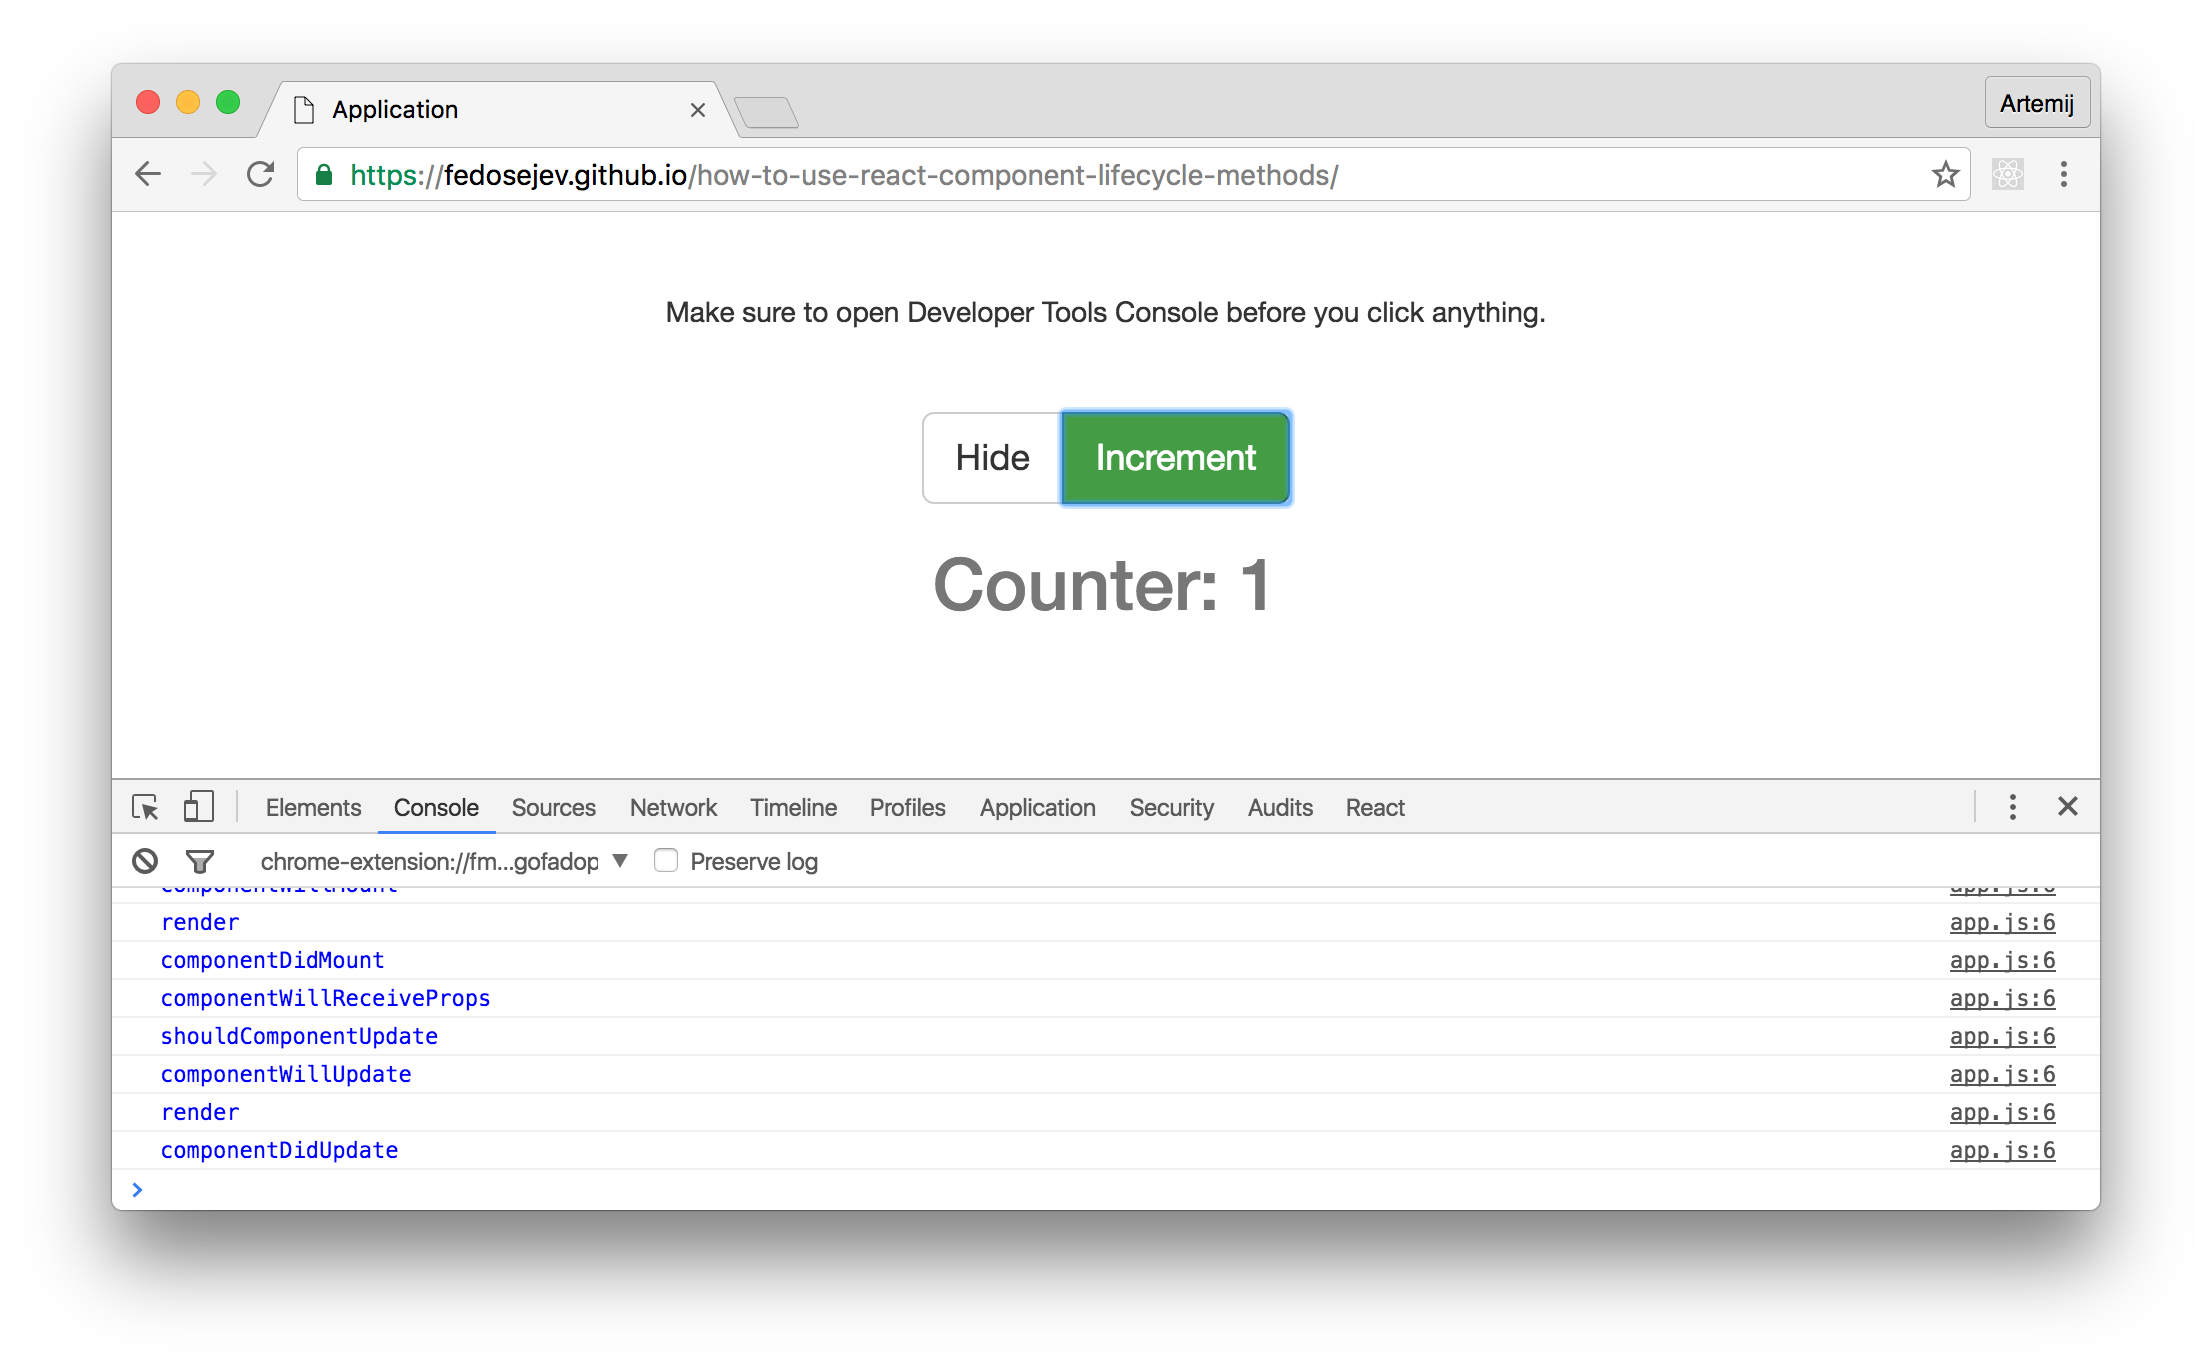
Wow! What just happened? We see new blue messages in our JavaScript Console.
Well, we've just updated the state of our Application component by clicking Increment button. After updating Application component's state, React decided to rerender Application component instance including the rerendering of the Counter component instance and passing new properties to it - our Counter component instance now gets 1 instead of 0.
So we've effectively updated our Counter component instance. We've changed it's life. It now entered it's Updating Phase, in which React calls the following lifecycle methods:
componentWillReceiveProps- this methods is called when our component instance receives new properties. Learn more about this methods.shouldComponentUpdate- this method decides whether or not ourCountercomponent instance needs to be rerendered. This is an opportunity for us to save time and skip rerendering if we know that it's not necessary. By default - React will rerender our component. We returntrueto signal that React should rerender it. Returningfalsewill prevent React from rerendering it. Learn more about this methods.componentWillUpdate- is called right before React will rerenderCountercomponent class instance into the DOM. Learn more about this methods.render- rerendersCountercomponent class instance into the DOM - that's when we see our counter displaying 1 instead of 0.componentDidUpdate- is called right after React has rerenderedCountercomponent class instance into the DOM. Learn more about this methods.
We can keep clicking Increment button - every click will trigger Counter component to go through another Updating Phase. Every click will trigger the same lifecycle methods.
But let's do something else instead.
Step 5: Click on Hide button
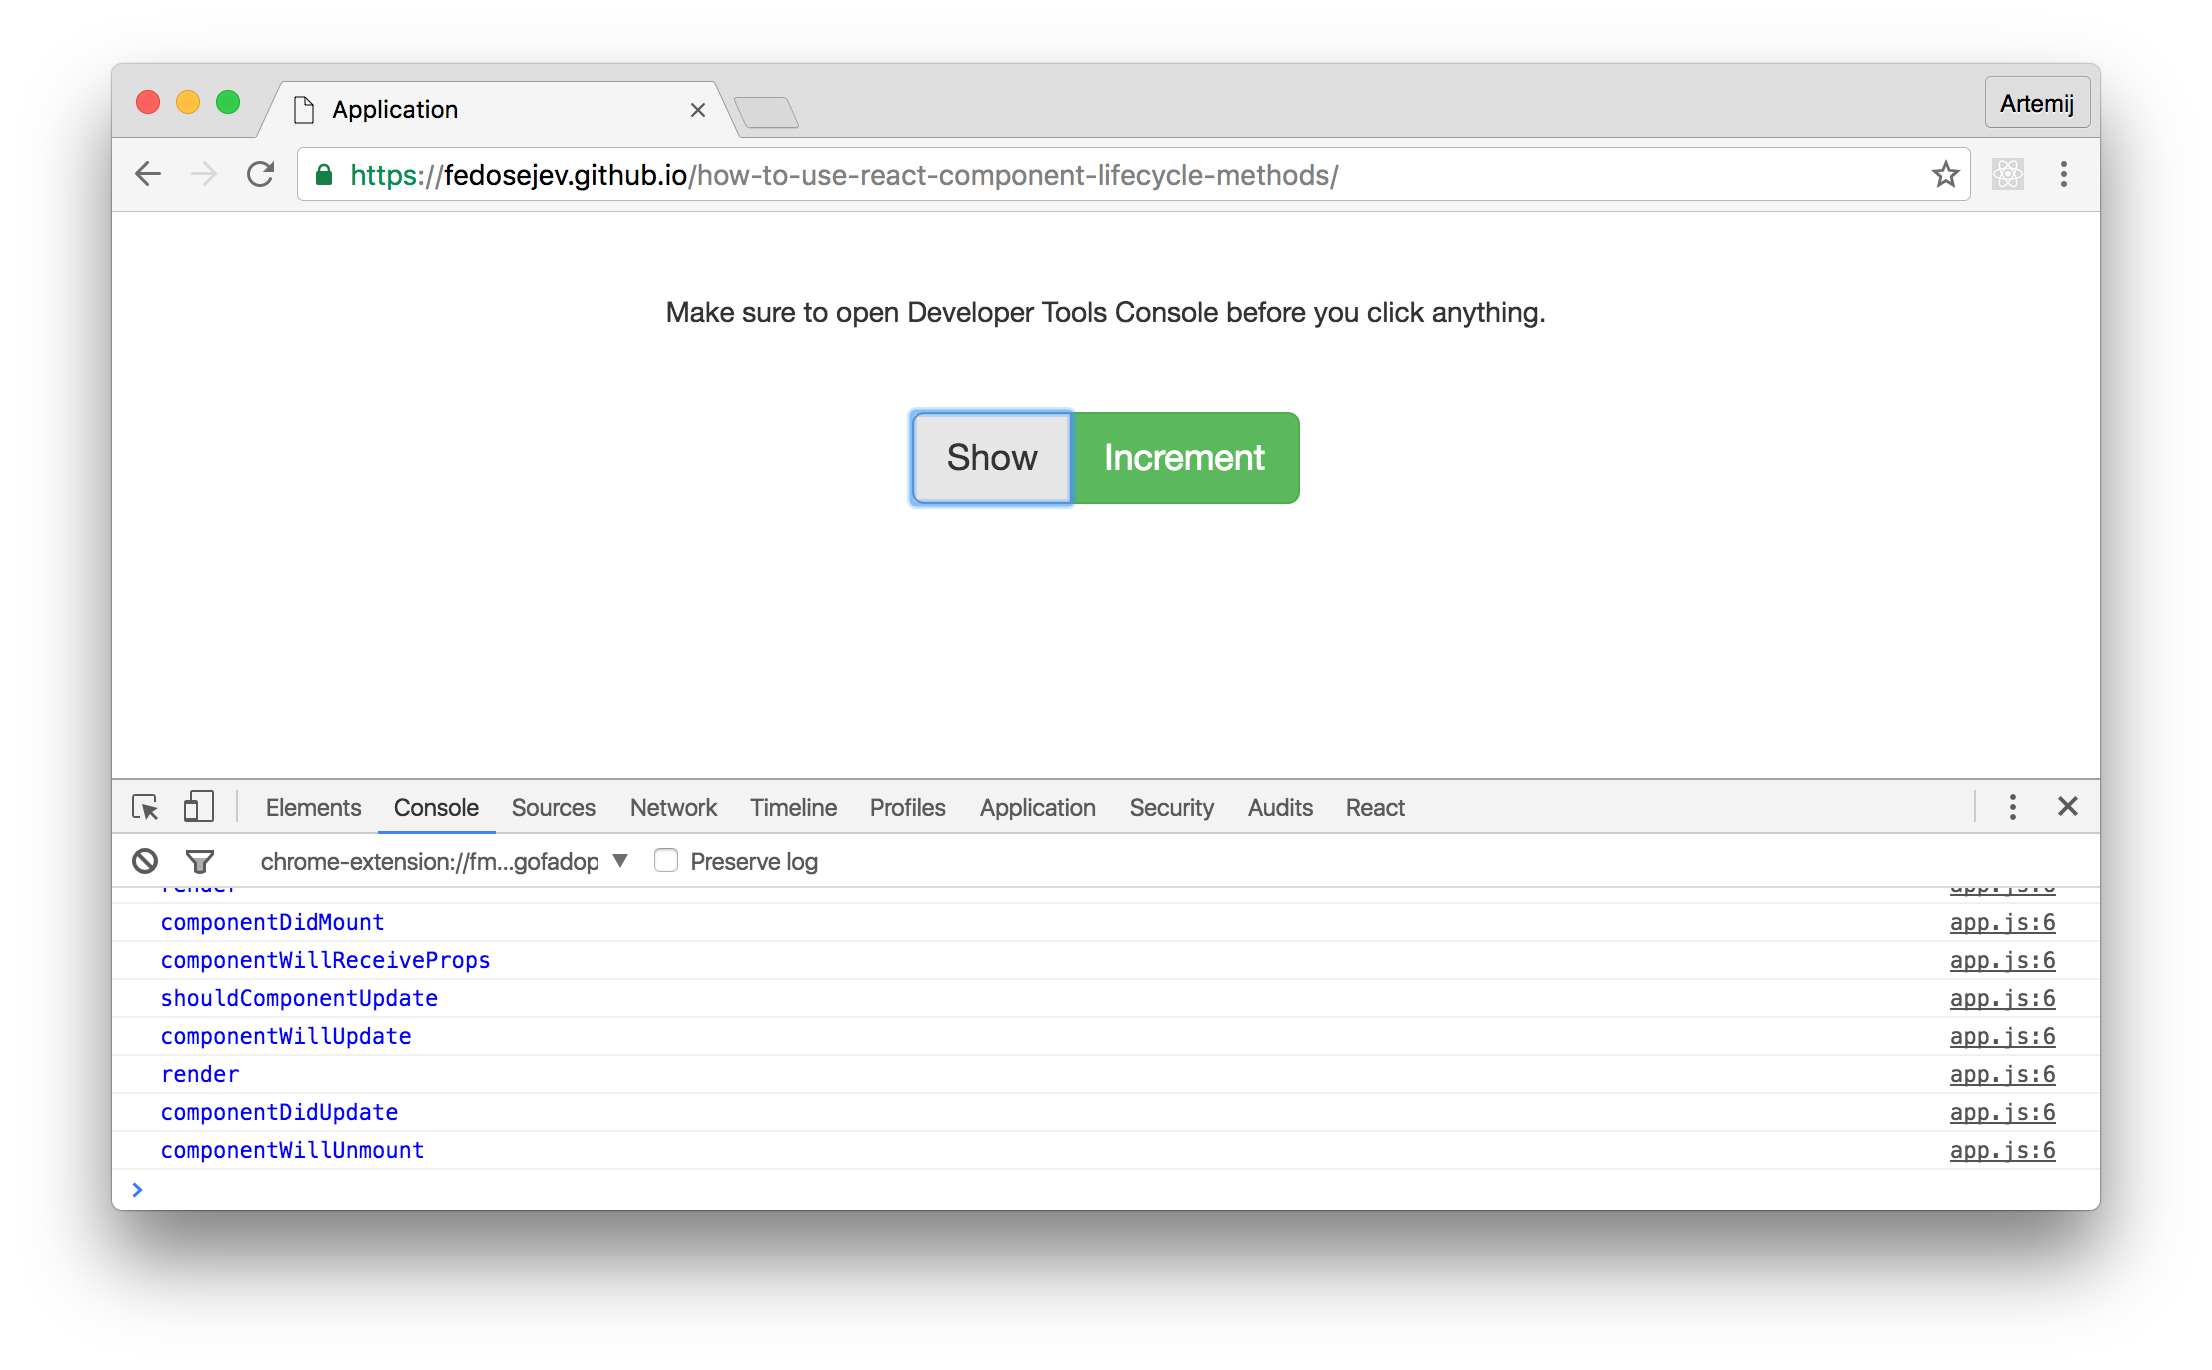
That's how the life of our Counter component class instance ends. We've just unmounted our Counter component. In other words: we've just removed it from the DOM.
This lifecycle phase is called Unmounting Phase and there only one lifecycle methods is being called by React during that phase:
componentWillUnmount- is called right before React unmounts (or removes)Countercomponent instance from the DOM.
Then it simply disappears from our screen and our DOM.
Now you've seen all three React component lifecycle phases:
Mounting PhaseUpdateing PhaseUnmounting Phase
During Mounting Phase React calls:
getInitialState.componentWillMount.render.componentDidMount.
In that specific order. Every time.
During Updating Phase React calls:
componentWillReceiveProps.shouldComponentUpdate.componentWillUpdate.render.componentDidUpdate.
In that specific order. Every time. But not necessarily all 5 methods are being called every time. If shouldComponentUpdate returns false then React won't call componentWillUpdate, render and componentDidUpdate methods.
During Unmounting Phase React calls:
componentWillUnmount
Just one method. Every time.
Notice that we might never update our Counter component. If you click Show and then Hide - our Counter component goes through Mounting Phase and Unmounting Phase - there is no Updating Phase:
As you can see Updating Phase might never happen. As well as Unmounting Phase might never happen if the user simply closes their web browser after initially loading your React web application.
And that's how to use React component lifecycle methods.
Thank you for reading this React tutorial!
Please take a look at the complete source code on GitHub and the live version of our app.
I hope you've enjoyed this tutorial and I would love to hear your feedback in the comments. You can get in touch with me via Twitter and email.

P.S. I've also written React.js Essentials book and I teach people React.js and JavaScript!